


[sc name=”ad_1″]
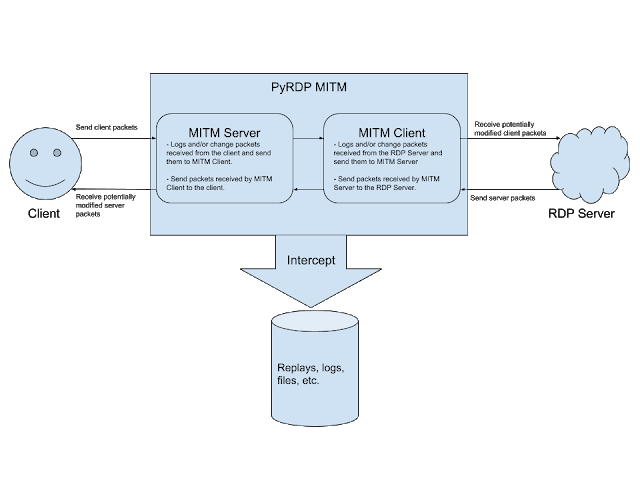
PyRDP is a Python 3 Remote Desktop Protocol (RDP) Man-in-the-Middle (MITM) and library.
It features a few tools:
- RDP Man-in-the-Middle
- Logs credentials used when connecting
- Steals data copied to the clipboard
- Saves a copy of the files transferred over the network
- Saves replays of connections so you can look at them later
- Run console commands or PowerShell payloads automatically on new connections
- RDP Player:
- See live RDP connections coming from the MITM
- View replays of RDP connections
- Take control of active RDP sessions while hiding your actions
- List the client’s mapped drives and download files from them during active sessions
- RDP Certificate Cloner:
- Create a self-signed X509 certificate with the same fields as an RDP server’s certificate
We have used this tool as part of an RDP honeypot which records sessions and saves a copy of the malware dropped on our target machine.
PyRDP was first introduced in a blogpost in which we demonstrated that we can catch a real threat actor in action. In May 2019 a presentation by its authors was given at NorthSec and two demos were performed. The first one covered credential logging, clipboard stealing, client-side file browsing and a session take-over. The second one covered the execution of cmd or powershell payloads when a client successfully authenticates. In August 2019, PyRDP was demo’ed at BlackHat Arsenal (slides).
Supported Systems
PyRDP should work on Python 3.6 and up.
This tool has been tested to work on Python 3.6 on Linux (Ubuntu 18.04) and Windows (See section Installing on Windows). It has not been tested on OSX.
Installing
We recommend installing PyRDP in a virtual environment to avoid dependency issues.
First, make sure to install the prerequisite packages (on Ubuntu):
sudo apt install libdbus-1-dev libdbus-glib-1-devOn some systems, you may need to install the python3-venv package:
sudo apt install python3-venvThen, create your virtual environment in PyRDP’s directory:
cd pyrdp
python3 -m venv venv
DO NOT use the root PyRDP directory for the virtual environment folder (python3 -m venv .). You will make a mess, and using a directory name like venv is more standard anyway.
Before installing the dependencies, you need to activate your virtual environment:
source venv/bin/activateFinally, you can install the project with Pip:
pip3 install -U pip setuptools wheel
pip3 install -U -e .
This should install all the dependencies required to run PyRDP.
If you ever want to leave your virtual environment, you can simply deactivate it:
deactivateNote that you will have to activate your environment every time you want to have the PyRDP scripts available as shell commands.
Installing on Windows
The steps are almost the same. There are two additional prerequisites.
- Any C compiler
- OpenSSL. Make sure it is reachable from your
$PATH.
Then, create your virtual environment in PyRDP’s directory:
cd pyrdp
python3 -m venv venv
DO NOT use the root PyRDP directory for the virtual environment folder (python3 -m venv .). You will make a mess, and using a directory name like venv is more standard anyway.
Before installing the dependencies, you need to activate your virtual environment:
venvScriptsactivateFinally, you can install the project with Pip:
pip3 install -U pip setuptools wheel
pip3 install -U -e .
This should install all the dependencies required to run PyRDP.
If you ever want to leave your virtual environment, you can simply deactivate it:
deactivateNote that you will have to activate your environment every time you want to have the PyRDP scripts available as shell commands.
Installing with Docker
First of all, build the image by executing this command at the root of PyRDP (where Dockerfile is located):
docker build -t pyrdp .Afterwards, you can execute the following command to run the container:
docker run -it pyrdp pyrdp-mitm.py 192.168.1.10For more information about the various commands and arguments, please refer to these sections:
To store the PyRDP output permanently (logs, files, etc.), add the -v option to the previous command. For example:
docker run -v /home/myname/pyrdp_output:/home/pyrdp/pyrdp_output pyrdp pyrdp-mitm.py 192.168.1.10Make sure that your destination directory is owned by a user with a UID of 1000, otherwise you will get a permission denied error. If you’re the only user on the system, you should not need to worry about this.
Using the player in Docker
Using the player will require you to export the DISPLAY environment variable from the host to the docker. This redirects the GUI of the player to the host screen. You also need to expose the host’s network and stop Qt from using the MIT-SHM X11 Shared Memory Extension. To do so, add the -e and –net options to the run command:
docker run -e DISPLAY=$DISPLAY -e QT_X11_NO_MITSHM=1 --net=host pyrdp pyrdp-player.pyKeep in mind that exposing the host’s network to the docker can compromise the isolation between your container and the host. If you plan on using the player, X11 forwarding using an SSH connection would be a more secure way.
Migrating away from pycrypto
Since pycrypto isn’t maintained anymore, we chose to migrate to pycryptodome. If you get this error, it means that you are using the module pycrypto instead of pycryptodome.
[...]
  File "[...]/pyrdp/pyrdp/pdu/rdp/connection.py", line 10, in <module>
    from Crypto.PublicKey.RSA import RsaKey
ImportError: cannot import name 'RsaKey'
You will need to remove the module pycrypto and reinstall PyRDP.
pip3 uninstall pycrypto
pip3 install -U -e .
Using the PyRDP Man-in-the-Middle
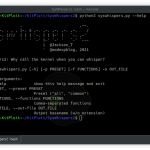
Use pyrdp-mitm.py <ServerIP> or pyrdp-mitm.py <ServerIP>:<ServerPort> to run the MITM.
Assuming you have an RDP server running on 192.168.1.10 and listening on port 3389, you would run:
pyrdp-mitm.py 192.168.1.10When running the MITM for the first time on Linux, a private key and certificate should be generated for you in ~/.config/pyrdp. These are used when TLS security is used on a connection. You can use them to decrypt PyRDP traffic in Wireshark, for example.
Specifying the private key and certificate
If key generation didn’t work or you want to use a custom key and certificate, you can specify them using the -c and -k arguments:
pyrdp-mitm.py 192.168.1.10 -k private_key.pem -c certificate.pemConnecting to the PyRDP player
If you want to see live RDP connections through the PyRDP player, you will need to specify the ip and port on which the player is listening using the -i and -d arguments. Note: the port argument is optional, the default port is 3000.
pyrdp-mitm.py 192.168.1.10 -i 127.0.0.1 -d 3000Connecting to a PyRDP player when the MITM is running on a server
If you are running the MITM on a server and still want to see live RDP connections, you should use SSH remote port forwarding to forward a port on your server to the player’s port on your machine. Once this is done, you pass 127.0.0.1 and the forwarded port as arguments to the MITM. For example, if port 4000 on the server is forwarded to the player’s port on your machine, this would be the command to use:
pyrdp-mitm.py 192.168.1.10 -i 127.0.0.1 -d 4000Running payloads on new connections
PyRDP has support for running console commands or PowerShell payloads automatically when new connections are made. Due to the nature of RDP, the process is a bit hackish and is not always 100% reliable. Here is how it works:
- Wait for the user to be authenticated.
- Block the client’s input / output to hide the payload and prevent interference.
- Send a fake Windows+R sequence and run
cmd.exe. - Run the payload as a console command and exit the console. If a PowerShell payload is configured, it is run with
powershell -enc <PAYLOAD>. - Wait a bit to allow the payload to complete.
- Restore the client’s input / output.
For this to work, you need to set 3 arguments:
- the payload
- the delay before the payload starts
- the payload’s duration
[sc name=”ad-in-article”]
Setting the payload
You can use one of the following arguments to set the payload to run:
--payload, a string containing console commands--payload-powershell, a string containing PowerShell commands--payload-powershell-file, a path to a PowerShell script
Choosing when to start the payload
For the moment, PyRDP does not detect when the user is logged on. You must give it an amount of time to wait for before running the payload. After this amount of time has passed, it will send the fake key sequences and expect the payload to run properly. To do this, you use the --payload-delay argument. The delay is in milliseconds. For example, if you expect the user to be logged in within the first 5 seconds, you would use the following arguments:
--payload-delay 5000This could be made more accurate by leveraging some messages exchanged during RDPDR initialization. See this issue if you’re interested in making this work better.
Choosing when to resume normal activity
Because there is no direct way to know when the console has stopped running, you must tell PyRDP how long you want the client’s input / output to be blocked. We recommend you set this to the maximum amount of time you would expect the console that is running your payload to be visible. In other words, the amount of time you would expect your payload to complete. To set the payload duration, you use the --payload-duration argument with an amount of time in milliseconds. For example, if you expect your payload to take up to 5 seconds to complete, you would use the following argument:
--payload-duration 5000This will block the client’s input / output for 5 seconds to hide the console and prevent interference. After 5 seconds, input / output is restored back to normal.
Other MITM arguments
Run pyrdp-mitm.py --help for a full list of arguments.
Using the PyRDP Player
Use pyrdp-player.py to run the player.
Playing a replay file
You can use the menu to open a new replay file: File > Open.
You can also open replay files when launching the player:
pyrdp-player.py <FILE1> <FILE2> ...Listening for live connections
The player always listens for live connections. By default, the listening port is 3000, but it can be changed:
pyrdp-player.py -p <PORT>Changing the listening address
By default, the player only listens to connections coming from the local machine. We do not recommend opening up the player to other machines. If you still want to change the listening address, you can do it with -b:
pyrdp-player.py -b <ADDRESS>Other player arguments
Run pyrdp-player.py --help for a full list of arguments.
Using the PyRDP Certificate Cloner
The PyRDP certificate cloner creates a brand new X509 certificate by using the values from an existing RDP server’s certificate. It connects to an RDP server, downloads its certificate, generates a new private key and replaces the public key and signature of the certificate using the new private key. This can be used in a pentest if, for example, you’re trying to trick a legitimate user into going through your MITM. Using a certificate that looks like a legitimate certificate could increase your success rate.
Cloning a certificate
You can clone a certificate by using pyrdp-clonecert.py:
pyrdp-clonecert.py 192.168.1.10 cert.pem -o key.pemThe -o parameter defines the path name to use for the generated private key.
Using a custom private key
If you want to use your own private key instead of generating a new one:
pyrdp-clonecert.py 192.168.1.10 cert.pem -i input_key.pemOther cloner arguments
Run pyrdp-clonecert.py --help for a full list of arguments.
Using PyRDP as a Library
If you’re interested in experimenting with RDP and making your own tools, head over to our documentation section for more information.
Using PyRDP with Bettercap
We developped our own Bettercap module, rdp.proxy, to man-in-the-middle all RDP connections on a given LAN. Check out this document for more information.
PyRDP Presentations
Contributing to PyRDP
See our contribution guidelines.
Acknowledgements
PyRDP uses code from the following open-source software:
- RC4-Python for the RC4 implementation.
- rdesktop for bitmap decompression.
- rdpy for RC4 keys, the bitmap decompression bindings and the base GUI code for the PyRDP player.
- FreeRDP for the scan code enumeration.
[sc name=”ad-in-article”]

Add Comment