


[sc name=”ad_1″]
Tor is free and open-source software for enabling anonymous communication. The name derived from the acronym for the original software project name “The Onion Router”.
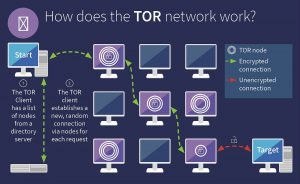
Tor directs Internet traffic through a free, worldwide, volunteer overlay network consisting of more than seven thousand relays to conceal a user’s location and usage from anyone conducting network surveillance or traffic analysis. Using Tor makes it more difficult to trace Internet activity to the user: this includes “visits to Web sites, online posts, instant messages, and other communication forms”.
Onion routing is implemented by encryption in the application layer of a communication protocol stack, nested like the layers of an onion. Tor encrypts the data, including the next node destination IP address, multiple times and sends it through a virtual circuit comprising successive, random-selection Tor relays. Each relay decrypts a layer of encryption to reveal the next relay in the circuit to pass the remaining encrypted data on to it. The final relay decrypts the innermost layer of encryption and sends the original data to its destination without revealing or knowing the source IP address. Because the routing of the communication was partly concealed at every hop in the Tor circuit, this method eliminates any single point at which the communicating peers can be determined through network surveillance that relies upon knowing its source and destination.
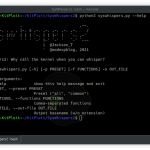
Step 1: Install Tor
sudo apt install tor -y
Step 2: Install Tor Browser
From the downloads page, pick the one for your OS
wget https://www.torproject.org/dist/torbrowser/9.5.3/tor-browser-linux64-9.5.3_en-US.tar.xz

tar xf tor-browser-linux64-9.5.3_en-US.tar.xz

cd tor-browser_en-US

./browser
After Tor Browser installs, you can open “Tor Browser” from your applications, and it will automatically connect to the Tor network. On your first run, it may ask you to “Connect” to Tor or “Configure” it. Choose the former unless you’re using a proxy or are in a region that bans Tor.
Step 3: Host a Server
Create an HTML file in nginx document root
sudo echo "It works" > /var/www/html/index.html
Start nginx
sudo systemctl start nginx
Step 4: Create a Hidden Service
We’re looking for our “torrc” file, which is most likely in /etc/tor. We can move to that directory with cd, as we run the command below.
cd /etc/tor/
Finally, confirm that “torrc” is present by simply running ls.
ls
torrc  torsocks.conf
If the torrc file is present, we will want to edit it. We can use Vim, emacs, or simply GNU nano to edit the file. To edit the file in nano, simply run the following in the terminal. If you’re root, you can skip the sudo.
sudo vim torrcIn the file, we’re looking for the section highlighted below. To find it quickly, use / to search for “location-hidden,” hit Enter, and you should jump right to it.
To direct Tor to our hidden service, we’ll want to un-comment two lines.
#HiddenServiceDir /var/lib/tor/hidden_service/
#HiddenServicePort 80 127.0.0.1:80
Step 5: Test the Tor Service
With the changes written to our torrc file and a server running at 127.0.0.1:80, making our server accessible over Tor is as simple as starting the Tor service. We can do this from the command line by typing the following.
sudo torUpon starting Tor for the first time with our new configuration, an .onion address will be generated automatically. This information will be stored in “/var/lib/tor/hidden_service” (or another directory if specified in the torrc file). First, in a new directory, if you’re not a root user, get root permissions.
sudo cat /var/lib/tor/hidden_service/hostnameVideo:
https://youtu.be/ouk7GSE66GI
[sc name=”ad-in-article”]


Add Comment