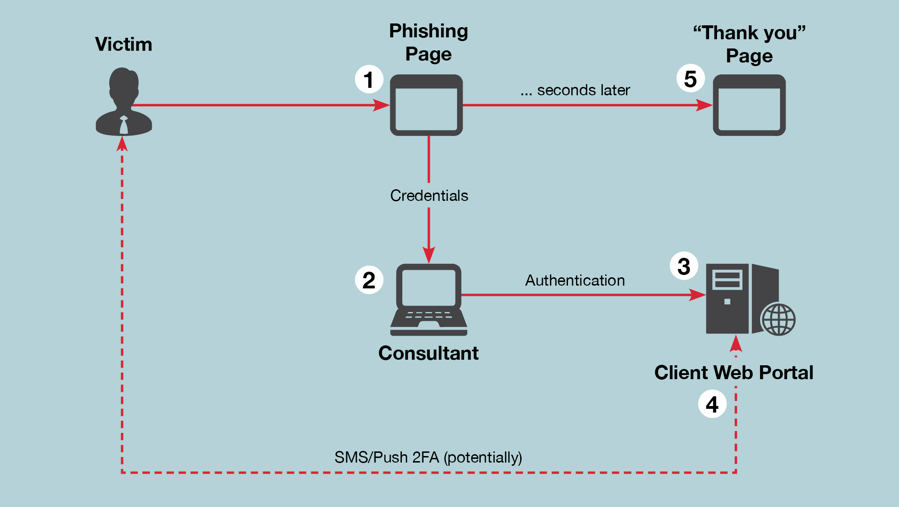
ReelPhish simplifies the real-time phishing technique. The primary component of the phishing tool is designed to be run on the attacker’s system. It consists of a Python script that listens for data from the attacker’s phishing site and drives a locally installed web browser using the Selenium framework. The tool is able to control the attacker’s web browser by navigating to specified web pages, interacting with HTML objects, and scraping content.
The secondary component of ReelPhish resides on the phishing site itself. Code embedded in the phishing site sends data, such as the captured username and password, to the phishing tool running on the attacker’s machine. Once the phishing tool receives information, it uses Selenium to launch a browser and authenticate to the legitimate website. All communication between the phishing web server and the attacker’s system is performed over an encrypted SSH tunnel.
Victims are tracked via session tokens, which are included in all communications between the phishing site and ReelPhish. This token allows the phishing tool to maintain states for authentication workflows that involve multiple pages with unique challenges. Because the phishing tool is state-aware, it is able to send information from the victim to the legitimate web authentication portal and vice versa.
This tool has been released along with a FireEye blog post. The blog post can be found at the following link: https://www.fireeye.com/blog/threat-research/2018/02/reelphish-real-time-two-factor-phishing-tool.html
Installation Steps
-
The latest release of Python 2.7.x is required.
-
Install Selenium, a required dependency to run the browser drivers.
- pip install -r requirements.txt
-
Download browser drivers for all web browsers you plan to use. Binaries should be placed in this root directory with the following naming scheme.
- Internet Explorer: www.seleniumhq.org/download/
- Download the Internet Explorer Driver Server for 32 bit Windows IE. Unzip the file and rename the binary to: IEDriver.exe.
- In order for the Internet Explorer Driver to work, be sure protected mode is disabled. On IE11 (64 bit Windows), you must create registry key “HKEY_LOCAL_MACHINE\SOFTWARE\Wow6432Node\Microsoft\Internet Explorer\Main\FeatureControl\FEATURE_BFCACHE”. In this key, create a DWORD value named iexplore.exe and set the value to 0.
- Further information on Internet Explorer requirements can be found on www.github.com/SeleniumHQ/selenium/wiki/InternetExplorerDriver
- Firefox: www.github.com/mozilla/geckodriver/releases/
-
Download the latest release of the Firefox GeckoDriver for Windows 32 bit. Unzip the file and rename the binary to: FFDriver.exe.
- On Linux systems, download the Linux version of Firefox GeckoDriver and rename the binary to: FFDriver.bin . Linux support is experimental.
- Gecko Driver has special requirements. Copy FFDriver.exe to geckodriver.exe and place it into your PATH variable. Additionally, add firefox.exe to your PATH variable.
-
- Chrome: https://chromedriver.storage.googleapis.com/index.html?path=2.35/
-
Download the latest release of the Google Chrome Driver for Windows 32 bit. Unzip the file and rename the binary to: ChromeDriver.exe.
- On Linux systems, download the Linux version of the Chrome Web Driver and rename the binary to: ChromeDriver.bin . Linux support is experimental.
-
- Internet Explorer: www.seleniumhq.org/download/
Running ReelPhish
ReelPhish consists of two components: the phishing site handling code and this script. The phishing site can be designed as desired. Sample PHP code is provided in /examplesitecode. The sample code will take a username and password from a HTTP POST request and transmit it to the phishing script.
The phishing script listens on a local port and awaits a packet of credentials. Once credentials are received, the phishing script will open a new web browser instance and navigate to the desired URL (the actual site where you will be entering a user’s credentials). Credentials will be submitted by the web browser.
The recommended way of handling communication between the phishing site and this script is by using a reverse SSH tunnel. This is why the example PHP phishing site code submits credentials to localhost:2135.
ReelPhish Arguments
- You must specify the browser you will be using with the –browser parameter. Supported browsers include Internet Explorer (“–browser IE”), Firefox (“–browser FF”), and Chrome (“–browser Chrome”). Windows and Linux are both supported. Chrome requires the least amount of setup steps. See above installation instructions for further details.
- You must specify the URL. The script will navigate to this URL and submit credentials on your behalf.
-
Other optional parameters are available.
- Set the logging parameter to debug (–logging debug) for verbose event logging
- Set the submit parameter (–submit) to customize the element that is “clicked” by the browser
- Set the override parameter (–override) to ignore missing form elements
- Set the numpages parameter (–numpages) to increase the number of authentication pages (see below section)
Multi Page Authentication Support
ReelPhish supports multiple authentication pages. For example, in some cases a two factor authentication code may be requested on a second page. To implement this feature, be sure that –numpages is set to the number of authentication pages. Also be sure that the session ID is properly tracked on your phishing site. The session ID is used to track users as they proceed through each step of authentication.
In some cases, you may need to scrape specific content (such as a challenge code) off of a particular authentication page. Example commented out code is provided in ReelPhish.py to perform a scraping operation.









Add Comment